Showing posts with label Braids. Show all posts

Friday, August 26, 2016

~*Braided Pull Throughs*~

~*Braided Pull Throughs*~
I got these ADORABLE flower clips and a headband from Every Little Detail yesterday and couldn't wait to use them. I decided to use the Pink and Sparkly Green flower first. There is still a sale going on so get over there before its over! You don't wanna miss out on 20% off, just type in SpringFever20 in check out.


Okay, to do this just seperate the front hair into 3 sections, the top and the sides. Then braid the sides and split the top one into 2 and braid each one. Pull the rest of the hair into a low ponytail and make a lot of braids out of the ponytail hair leaving some of the ends unbraided.


Pull the ends of the ponytail braids under and through making sure it comes through the very middle top of the ponytail and then twist the seperate braids around the ponytail and secure with an elastic on top.
So now you have the 2 layers of hair, hold it straight up and back brush it and curls under a little. Then add your bow or flower like the one I got from Every Little Detail and your set! Here is the finished do'


Once again-sorry about the crappy dark pictures. I will hopefully be getting a new camera soon :)
Thank you very much, Jessica!


Wednesday, February 24, 2016

Upcoming Renaissance Festival!


So it is that time of year again! The Ren Fest has started and my daughter and I are going next month. So I am going to try to get some new Renaissance Hairstyles up before then.


We have been going to the Arizona Renaissance Faire since Chelina was in Kindergarten. It's always fun to spend the day there. So much artistry and creativity to enjoy! It always give's me a lot of  inspiration for hair styles.


Besides, it's nice to take a break from the present reality and take a step back in time. Can't always take life too seriously lol.

So check back with us to see the pic's. I know I have been slow moving on my return but I recently started a Instagram account for the blog to give me more motivation lol. All the talented Hair Artist give me motivation and inspiration to get my tail in gear!

If you would like to follow us
IG: girls_curls_hair

Wednesday, March 23, 2011

Pretty Ponytails:Rosette Braid Topped Side Ponytail

This is the other style we did with the rosette braids. Sorry the pictures are so crappy. This is a really easy hairstyle and it looks soooo pretty!

 Start with a smooth side ponytail.
 Using the hair from the top of the ponytail, make 3 small braids (not too small though). Secure the ends with clear elastics.
 Start rolling the braid up.
 Place it so the end of the braid you rolled up that shows the elastic is on the back side and take a couple bobby pins and slide through attaching it to the right corner above the ponytail. Then roll a second one for the middle just a little higher the the first on, secure. Now the third one. We left a couple of the ends stay out so it would look like leaves. You can hide them or leave them out. * The brighter pictures were taken after she had slept in this over night and been at school all day. They stay pretty well!


 Thank you for reading, we love our followers! Please comment to let us know what styles you prefer :) 


Saturday, March 19, 2011

Rosette Braids Headband (Picture Day Hair)

This is the style we did for picture day before school let out. It is like a rosette headband but just with the hair. It is pretty fast and simple to do as well. I am sorry I didn't get the step by step photo's for this but we did it in the morning and well, I have mentioned before how our mornings are and that is why we usually do the style the night before but she had Cheer Tumbling the night before so we just did it in the morning.....it was a very early morning for us lol.

Anyways, let me know what you think. What do you like to do more for picture day updo's or hair down?


Awesome outfit we got from Kohl's :)

If you would like to donate money to help the people of Japan you can go here , sign up, and they will double the money! It is truly devastating what these people are going through! This is only going on for about 1 day (time left) so check it out soon. Even $5 can be doubled to $10 and if enough people do that it can help a great deal!

Also check out this post to get 50% off at Hair Flair Boutique!!!


Wednesday, March 16, 2011

St Patrick's Day Pull Throughs


This is what this kind of braid reminds me of, a Celtic Knot

Start by making 3 ponytails across the top and then pull the hair through from the back towards the front.
It should look like this.
Now separate into 2 pieces.
Braid down all the way but fairly loose. The take 2 of the strands in your right hand and the 1 strand in your left and slid the 2 strands up the 1 strand.
Do this with all the ponytails that you split into 2 sections and secure at the bottom. Make a ponytail with the rest of the hair, add a cute little bow or flower, curls and your done!

Friday, February 4, 2011

~♥~5 Heart Valentine's Day Hair Style~♥~

~♥~5 Heart Valentine's Day Hair Style~♥~

 First, apply gel to wet hair and part the hair down the middle, then separate a section of hair that is just behind the ear on each side and make a ponytail. Use either a piece of string, a topsy tail, or a rat tail comb, and pull the hair through the back and into the front.  
 Split that ponytail in half and braid each side like this.
 Make a third section of hair and secure with an elastic and then secure the braids with it like this or do like I ended up doing and just pull the braided pieces through going back where you do the next pull through. Hope this makes sense look at the picture after this one below. You can do it either way though.

 I ended up changing it and pulled the braids through like this.

 Now braid the second section like you did the first.
 Now just do the same with the other side.


 At this point it should look something like this.
 Now with the bottom half of the hair, make a ponytail adding the extra hair from the braids from the first heart (I didn't smooth it down so you can see it) Do a pull through going from the bottom, up. Then connect the left braid and right braid from the sides and pull through going from top to bottom so it comes out the bottom.
 Now with the hair you pulled through the top, split it in half and braid to make the heart.
 Connect it to the hair coming through the bottom and then just go through and place bobby pins where needed to support the hearts


Hope you like this style and we will be adding another soon. Thank you for reading :) !!!


Wednesday, January 12, 2011

Pigtails, Squishy Braids, and a Poof....Oh My!

Ok, I don't have anymore pictures of this one, I really liked the way it looked though. It is pretty and simple. First I made the little poof with her bangs that we are growing out ( I am considering cutting them though....they bug lol) I left a little bit down on each side and then put the rest into pigtails. I separated a small amount of hair on the top section of each pigtail. I did a loose braid and then at the end I slid 2 of the 3 braid strands up to make the squishy braid. I think it looks a lot like Celtic Knot work. Anyways I secured each squishy braid with an elastic and there you go! Enjoy!

Saturday, July 31, 2010

Puffy Braid Halo


I'm sorry I don't have step by step pics for this but it is really simple. What I did was start with the bangs in front. I made kind of an upside down triangle so the point is pointing to the back. Then I split that in half and added some hair to the right side of it and secured with an elastic. Then I took a little more hair and added it to the puffy braid. Keep doing this until you get to the end of the right side. Now do the same with the other side. When you're done with that take the hair from each side and split it into 4 pieces, blend the two middle pieces together so you now have three. Braid down and curl, maybe add a flower to the end and your done!

Also****** Please check out my last post. I need your opinion on the bow's I have been messing around with :) ! Look here

Saturday, July 24, 2010

Classy Cross Over

We did this beautiful style today. I love these styles with different braids or twist kind of draped through.

We started by parting the hair down the middle.


Then we made this V in the front.


Start doing a Dutch Braid at the tip of the V on the right side.


I left out a little bit of hair up front

Continue the braid into the rest of the hair so the Dutch Braid is going around to the middle. Leave out about 3/4 of one side of the braid on the right side.

It should look like this.
Now do the other side the same way.

Now add both sides together and make it into one braid going down but leave some hair at the bottom for the little flip part. Also make 2 twist braids on each side.

Pull the bottom of the hair up through the middle. Push the braid up a little so it isn't hanging so much and secure with bobby pins.

So far it should look about like this.

I took a little butterfly clip and cinched together the bottom hair to make it neater.

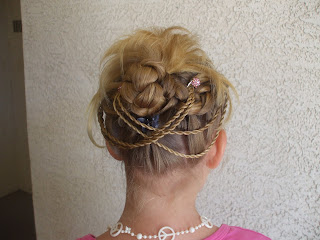
Now take the twist braids from the right and cross them over to the left corner of the middle bun and hold it in place with a pretty clip, leaving a little sticking up. Now do the same with the twist on the left side and cross over to the right. Curl under a little and back brush just a little spray and your done.


We hope you like this style and as always we would love to see pictures if you try this on your daughter or anyone else :)