Showing posts with label Buns. Show all posts

Friday, December 2, 2016

Flippy Flower

Fippy Flowers

*Somehow some of my post have been...not deleted, but not live either so these are kind of way out of sequence but I wanted to get them back up. I will have one day of retro styles, I guess you could say, being reposted but if you want to see our newest, go to our Sweet Sixteen post....I told you this was retro lol. She is now 16!

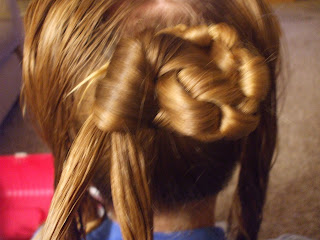
Ok this is a very simple style I did kind of by accident with a very pretty adjustable headband from Every Little Detail. She has all kinds of beautiful hair accesories! We love the Fun & Funky Flowers:).I was trying to figure out what to do with her hair after she had twist in and this just kind of formed. I didn't do a step by step but all it is, is a Double Twisted Bun with the flippy end that is kinda wavy (you could crimp it) twist one side around more then the other which makes the flower look. Separate the flippy part so it fans out. Spray and your done. I just added the pretty pink headband and a white flower and I was done :)

Silly Face lol


Fun Flippy Double Twist Buns

Fun Flippy Double Twist Buns Repost

*Somehow some of my post had been...not deleted but not live either so these are kind of way out of sequence but I wanted to get them back up. I will have one day of retro styles being reposted but if you want to see our newest, go to Sweet Sixteen post...I told you this was retro lol. She is now 16!

This is a pretty easy style and I think it comes out looking very cute! What I did was put some gel through out the hair and then make a single pony for the top part of the hair. Don't start by the ears though, start closer to about eye level if that makes sense. Secure with an elastic.
Now separate a small section of hair below the ear and make a small pony using a clear elastic and then to a twist braid or regular braid. We did the twist because it looks nice when you twist both sides together. Do this for both sides secure the bottom with a clear elastic.
Now separate the remaining hair into 2 ponies. Do Double Twist Buns as in my other post, leaving the little flippy part at the top. Do all 3 ponies and make sure to secure them with about 2 of those clear elastics so they don't break.
Pull the side twisted braids up and twist together and secure the ends with a bobby pin, clip,or ribbon or you can even take a small piece of sewing thread and tie around the twist.
Curl the top pony so it falls on each side and curl the other two just under and back brush a little to add a little extra poof, spray good and your done!


Ok I think I am gonna start taking donations for a better camera lol :) I know they are awful and dark but I hope they help.


Sunday, March 6, 2011

Knotty Bun

We have been very knotty lol...okay that's way to corny but oh well :) Anyways here's how to do this Do'

Start out with wet, gelled hair and separate the top from ear to ear and part down the middle. Then make a ponytail with the rest.
Split the pony in two and start tying it in knots.
Like this...
As far down as you can go.
Wrap it over the right side making the bun. Secure with bobby pins.
Take the hair from the right and cross it over to the left and split in two.
Start tying the knots.
Like this....
Now take the left side of hair and cross it over to the right and split in two and tye in knots.
Wrap them, going in opposite directions around the first part of the bun and secure with bobby pins.


Hope you like it :0) Stay tuned we will be posting St Patrick's Day Hairstyles!!

Wednesday, January 12, 2011

Pink And Purple Elastic Cornrows

Pink And Purple Elastic Cornrows
This is pretty easy to do you just have to try and make your parts even. I made the first part where the front pink elastics are and then did each side by that part which helps. Then I alternated the colors. Then with the hair from the elastic cornrows I did the weave pattern and then into the buns.


Hope you like this one :) If anyone needs further instruction let me know :)

Saturday, July 3, 2010

4th Of July style

4th Of July style
Okay so I started out by separating the hair down the middle. Use a good amount of gel for this.
Then across the top
I split the right side into 2 sections. Then I took the right side of that and make 6 sections across.

Now take the bottom section and split again, twist hair so it will fit through the bead and add to the section to the right of it.
*these pics look different cause I was going to have 2 rows of beads on the left and right of each pigtail..it will make more sense later. This shows how to do the beads though.
Secure with a clear elastic.
Do the same with the next one.
So add the red, white, and blue beads going up the right side like this.
Until it looks like this
Now the left side.
Like this.
Then I took a section on the left just behind her bangs for a cornrow and braided it down, then added red, white, and blue beads to that braid and secure with a clear elastic at the bottom.
Now go back and starting at the bottom take the little ponies you have created and split them in half add the section so you have 3 strands and start your braid. Now just dutch braid by adding each side as you go up and then secure at top.
We added the left over hair from the crown and made pigtails and made messy buns to weave the Glowbys into.
We added the bows I made as well.

This is with pigtails instead of buns.

For a more dramatic look, you can make this like I was starting out and instead of having the one braid going up the middle you will have two braids and more beads. This is kinda confusing to explain since we changed the way we were doing it but Chelina was tired and it takes longer to do the other way. I hope this explains enough though. I got some of the inspiration for this from Kristi at http://kjbraids.blogspot.com/ and Nikki at http://beadsbraidsbeyond.blogspot.com/ both of them super talented . If you want to get the Glowbys go here I didn't take a pic with them in cause it wouldn't show up with my camera. They are awesome though! Well enjoy and we hope you have a fun, safe 4th!


Saturday, June 12, 2010

Ren Fest Braids Step By Step

Sorry this took so long to get up and I hope these pictures are descriptive enough. If anyone still has problems with it I can do a video. It is hard to be doing the styles and have a free hand to take the pictures at the same time. So here goes.


First, separate the hair down the middle and then across the crown. Apply gel through out hair.


Start where these 3 pieces of hair are in like a V at the corner and make your dutch braid kind of at an angle and stop where the hair was separated.


It should look like this. Now secure with a clear elastic.


Now make another ponytail like this.


Do a twist braid or a regular 3 strand braid, I like it better with the twist braid.


Wrap it around the elastic into a bun going counter clockwise.Secure with bobby pins.


Now separate the side ponies into 2 pieces.


Now make 3 twist braids with the bottom half and a 4 strand braid with the top.


It should look about like this so far.


Now take the right side 4 strand braid and wrap it around the bun and secure with bobby pins. then going in the opposite direction wrap the left side 4 strand braid around the bun and secure with bobby pins.


Now for this part you can do it 2 different ways. You can either take the 3 twist braids from the left and cross them over to the right and wrap the ends around that elastic like in the pic or you can take the 3 twist braids and cross them over to the bun and wrap the ends around that and secure. Then cross the right side over to the left and do the same thing for which ever way you chose. Secure with bobby pins and cute clips, curl the remaining hair (or leave straight) and your done. Spray well and use plenty of gel.


This is what it looks like from the top.


The side.


And a hello from Chelina :)