Showing posts with label Dutch Braids. Show all posts

Friday, December 2, 2016

Ƹ̵̡Ӝ̵̨̄Ʒ Dutch Braid Pull Throughs Ƹ̵̡Ӝ̵̨̄Ʒ

Dutch Braid Pull Throughs

*Somehow some of my post have been...not deleted, but not live either so these are kind of way out of sequence but I wanted to get them back up. I will have one day of retro styles, I guess you could say, being reposted but if you want to see our newest, go to our Sweet Sixteen post....I told you this was retro lol. She is now 16!

This is one of my favs. I used it to shorten the look of Chelina's piggies :) It is really cute and keeps the hair from getting all tangled. You can get the short hair look without having to cut her hair. So I found these pics from way before I ever heard of a Hair Blog much less thought of doing one. So here it is with my cute little princess the day before her 5th B-Day.


So all you do is make dutch braids starting in the front and going all the way down to almost the bottom. Then pull one side up to the opposite side and pull it through the bottom of the dutch braid so it is coming out the top then put a cute elastic on each one. and curl the hair under. You can make it shorter also, it just depends on how far down you continue the braids down.
Enjoy and if you have questions, ask away :)

Saturday, April 30, 2011

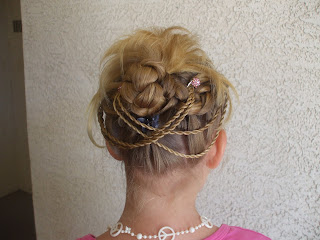
Dutch Braids with Beaded Accent Twist Braids


Sorry I haven't posted! My desktop has died so now I have to just get on someone else's whenever I have the chance. I was so rushed this year that I didn't get a chance to do a step by step. I will though, if enough people are interested. It looks complicated but it is really pretty easy, just a little time consuming...not too bad though and the end result is worth it. I will also be trying some other things with this hairstyle. So let me know what you think!!!

**Please bare with me  while I am trying to get my computer going...or just get a new one lol.

Wednesday, April 13, 2011

Renaissance Style: Dutch Braid Twist with Accent Braids

Well we didn't make it to the Renaissance Festival this year :( There has just been a ton of stuff going on ( I am expanding my business! ) but my sister did go and asked me to do her hair. This is a style I did quickly in the morning before they left to go to the festival. I was in a hurry and didn't get enough step by step shots but believe it or not this is pretty simple if you can dutch braid.

 I started out with damp hair and applied gel separating it on the left side. Then I dutch braided down leaving a small amount of hair in a few sections, out of the braid for the accent twist.
 When I had braided back both sides, I secured the ends with clear elastics and put them together. Taking the ends first I rolled them into a bun going towards the left side and secured with bobby pins. Then I made Twist Braids out of the sections I left out (about 4) and secured with clear elastics.
 I took the one closest to the back and kinda of stuffed it behind the bun and secured with a bobby pin.
 The second Twist Braid I did the same thing with.
 The third and fourth Twist Braids I put on the opposite side of the bun and secured with bobby pins.
 And this is the end result! I love the way it looks on her dark hair :) The blue flower just adds enough color too.


We hope you like this style! We will be posting some more Renaissance Hairstyles soon so keep a look out for the instructions on how to do these fun Renaissance Styles!

Saturday, July 24, 2010

Classy Cross Over

We did this beautiful style today. I love these styles with different braids or twist kind of draped through.

We started by parting the hair down the middle.


Then we made this V in the front.


Start doing a Dutch Braid at the tip of the V on the right side.


I left out a little bit of hair up front

Continue the braid into the rest of the hair so the Dutch Braid is going around to the middle. Leave out about 3/4 of one side of the braid on the right side.

It should look like this.
Now do the other side the same way.

Now add both sides together and make it into one braid going down but leave some hair at the bottom for the little flip part. Also make 2 twist braids on each side.

Pull the bottom of the hair up through the middle. Push the braid up a little so it isn't hanging so much and secure with bobby pins.

So far it should look about like this.

I took a little butterfly clip and cinched together the bottom hair to make it neater.

Now take the twist braids from the right and cross them over to the left corner of the middle bun and hold it in place with a pretty clip, leaving a little sticking up. Now do the same with the twist on the left side and cross over to the right. Curl under a little and back brush just a little spray and your done.


We hope you like this style and as always we would love to see pictures if you try this on your daughter or anyone else :)


Monday, June 28, 2010

Butterfly Braids

Butterfly Braids


For this style we were going for a butterfly kind of look and this is what we ended up with. It would have been better if I had made 2 loops on each side of the braid but this was cute as well.


First, part the hair down the middle and then make a Dutch Braid down the right side BUT at about the crown area split the hair in half that your adding and leave a half out of the braid.


It should look like this.


Do both sides and then do Twist Braids for the hair you left out.


Twist the twist braids together a couple timesin the middle.


Now start adding the twist to the remaing part of the Dutch Braid at about the nape of the neck and continue to braid as far down as you can.


This is how the braids should look by now.


Here are some 4th of July bows I made. I have 2 extra if anyone is interested in purchasing them let me know and I can send them right out. Or if your local you can pick them up just let me know soon since the 4th is almost here! :) I will sell the set for $10 .


Saturday, June 12, 2010

Ren Fest Braids Step By Step

Sorry this took so long to get up and I hope these pictures are descriptive enough. If anyone still has problems with it I can do a video. It is hard to be doing the styles and have a free hand to take the pictures at the same time. So here goes.


First, separate the hair down the middle and then across the crown. Apply gel through out hair.


Start where these 3 pieces of hair are in like a V at the corner and make your dutch braid kind of at an angle and stop where the hair was separated.


It should look like this. Now secure with a clear elastic.


Now make another ponytail like this.


Do a twist braid or a regular 3 strand braid, I like it better with the twist braid.


Wrap it around the elastic into a bun going counter clockwise.Secure with bobby pins.


Now separate the side ponies into 2 pieces.


Now make 3 twist braids with the bottom half and a 4 strand braid with the top.


It should look about like this so far.


Now take the right side 4 strand braid and wrap it around the bun and secure with bobby pins. then going in the opposite direction wrap the left side 4 strand braid around the bun and secure with bobby pins.


Now for this part you can do it 2 different ways. You can either take the 3 twist braids from the left and cross them over to the right and wrap the ends around that elastic like in the pic or you can take the 3 twist braids and cross them over to the bun and wrap the ends around that and secure. Then cross the right side over to the left and do the same thing for which ever way you chose. Secure with bobby pins and cute clips, curl the remaining hair (or leave straight) and your done. Spray well and use plenty of gel.


This is what it looks like from the top.


The side.


And a hello from Chelina :)