Saturday, July 31, 2010

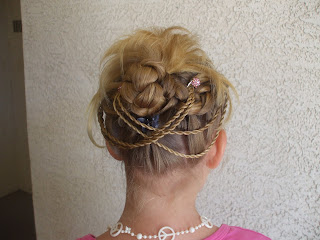
Puffy Braid Halo


I'm sorry I don't have step by step pics for this but it is really simple. What I did was start with the bangs in front. I made kind of an upside down triangle so the point is pointing to the back. Then I split that in half and added some hair to the right side of it and secured with an elastic. Then I took a little more hair and added it to the puffy braid. Keep doing this until you get to the end of the right side. Now do the same with the other side. When you're done with that take the hair from each side and split it into 4 pieces, blend the two middle pieces together so you now have three. Braid down and curl, maybe add a flower to the end and your done!

Also****** Please check out my last post. I need your opinion on the bow's I have been messing around with :) ! Look here

Saturday, July 24, 2010

Hair Shows and Hair Bows


Okay, so has anyone else seen the commercial for The Hair Battle Spectacular on Oxygen? It is a reality t.v. show about stylist who are competing by creating the best Fantasy/creative hairstyle! Now I know none of these are styles we would put on our daughters BUT oh the inspiration! You can take an over the top style and take bits and pieces of it to create your own toned down masterpiece!

So it looks like it's going to be very interesting so if your like me and love anything to do with hair then tune in on August 10 at 10 PM ET/PT on Oxygen!


~~ALSO~~

Okay, I have been dabbling in making hair accessories as a way to make some extra money for birthdays and holidays coming up. I make jewelry as well but this is my first try at bow making SO...I am asking for your help. I want to know what you think of the one's I have done so far and some I am still working on like the Purple and Blue flower one. So PLEASE let me know what you think and what is your favorite and of course if anyone one is interested in one let me know :)

Classy Cross Over

We did this beautiful style today. I love these styles with different braids or twist kind of draped through.

We started by parting the hair down the middle.


Then we made this V in the front.


Start doing a Dutch Braid at the tip of the V on the right side.


I left out a little bit of hair up front

Continue the braid into the rest of the hair so the Dutch Braid is going around to the middle. Leave out about 3/4 of one side of the braid on the right side.

It should look like this.
Now do the other side the same way.

Now add both sides together and make it into one braid going down but leave some hair at the bottom for the little flip part. Also make 2 twist braids on each side.

Pull the bottom of the hair up through the middle. Push the braid up a little so it isn't hanging so much and secure with bobby pins.

So far it should look about like this.

I took a little butterfly clip and cinched together the bottom hair to make it neater.

Now take the twist braids from the right and cross them over to the left corner of the middle bun and hold it in place with a pretty clip, leaving a little sticking up. Now do the same with the twist on the left side and cross over to the right. Curl under a little and back brush just a little spray and your done.


We hope you like this style and as always we would love to see pictures if you try this on your daughter or anyone else :)


Saturday, July 17, 2010

Basic Twist Back Over a Scarf


I was going through some older pics and I found these. It is a pretty basic hairstyle and doesn't take long. Just a good way to add some flair and it holds the scarf in well. I just separated the hair from ear to ear over the top and then split that into 2 going over in the same direction. Then I split that into 3 vertical sections so you will have six squares. I placed the scarf in the middle and added each front section to the back so there were 3 sections now. I secured them with elastics and then split the middle one and twisted it with the right and left sides to make the twist braids. I added this to the remaining hair and made a ponytail and twisted it too and there you go :)


Friday, July 16, 2010

Late 4th of July Post

Sorry for getting this on so late after the holiday but we were having some issues with the pic transfers. Anyhow, we kept the style but added some twist braids with beads to the pigtails and curled it some. It is just so dang hot here that the curl doesn't last very long :(
We also did these stars with a stencil and her cheer make up which I thought turned out adorable!

So I just wanted to share these with you :)


Saturday, July 3, 2010

4th Of July style

4th Of July style
Okay so I started out by separating the hair down the middle. Use a good amount of gel for this.
Then across the top
I split the right side into 2 sections. Then I took the right side of that and make 6 sections across.

Now take the bottom section and split again, twist hair so it will fit through the bead and add to the section to the right of it.
*these pics look different cause I was going to have 2 rows of beads on the left and right of each pigtail..it will make more sense later. This shows how to do the beads though.
Secure with a clear elastic.
Do the same with the next one.
So add the red, white, and blue beads going up the right side like this.
Until it looks like this
Now the left side.
Like this.
Then I took a section on the left just behind her bangs for a cornrow and braided it down, then added red, white, and blue beads to that braid and secure with a clear elastic at the bottom.
Now go back and starting at the bottom take the little ponies you have created and split them in half add the section so you have 3 strands and start your braid. Now just dutch braid by adding each side as you go up and then secure at top.
We added the left over hair from the crown and made pigtails and made messy buns to weave the Glowbys into.
We added the bows I made as well.

This is with pigtails instead of buns.

For a more dramatic look, you can make this like I was starting out and instead of having the one braid going up the middle you will have two braids and more beads. This is kinda confusing to explain since we changed the way we were doing it but Chelina was tired and it takes longer to do the other way. I hope this explains enough though. I got some of the inspiration for this from Kristi at http://kjbraids.blogspot.com/ and Nikki at http://beadsbraidsbeyond.blogspot.com/ both of them super talented . If you want to get the Glowbys go here I didn't take a pic with them in cause it wouldn't show up with my camera. They are awesome though! Well enjoy and we hope you have a fun, safe 4th!